The History & Evolution of Backsplashes

The area of material behind your sink– whether in the kitchen, bathroom, laundry room or wherever… You probably take it for granted! The truth is that backsplashes are a relatively new innovation in home design.

ORIGINS

A backsplash is designed to prevent water, grease and other liquids from staining the wall behind a sink. Short, functional backsplashes were likely introduced when indoor plumbing became common in homes and businesses. This new convenience was soon adapted for other purposes such as decor and luxury.

EVOLUTION

As design evolved, some sinks were created with their own backsplashes– often called “farmhouse-style.” By the mid-1900s, bright and patterned tiles became the popular choice for a backsplash. In the 80s and 90s, style moved towards neutral colours like cream, beige and off-white.

MODERN &BEYOND

Recent years have seen the popularization of elements like stone, metal, ceramic and glass. Designs range from simple mosaics inspired by midcentury subway stations to intricate patterns that combine different materials. When it comes to the future of backsplashes– the sky is the limit! Contemporary trends include diverse textures, faux-materials like wood and even a return to bold 1950s patterns.

If you have questions about adding or changing a backsplash, contact or visit us today! The experts here at Stoneworks will walk you through the numerous options in design and material available for any backsplash project.

KITCHEN ISLANDS: History & Evolution

kitchen-island-marble
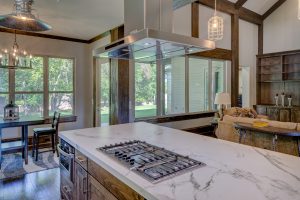
A wide open kitchen with a central island area is a common sight in modern homes, but it was not always this way. Design evolved from classical, more temporary use to what is now widely considered a cornerstone of today’s kitchen. Keep reading for Stoneworks’ crash course in the history, evolution and status of the kitchen island.

HISTORY

Simple tables and freestanding surfaces have been used in kitchens recorded as far back as Victorian England. More contemporary, built-in islands that we know today did not get their start until the 1950s. In the mid-century housing boom, new materials and construction methods gave rise to more compact appliances and homes with more open floor plans. The accompanying designs gave birth to the kitchen island, but it did evolve over time.

EVOLUTION

Consumer kitchen technology became more efficient, sleek and multipurpose in the 80s and 90s. Islands benefited greatly and became even more popular in new homes, as well as renovations. Social norms also evolved– the kitchen was once meant to be hidden, but now it was a place to gather and enjoy life. The basics stayed consistent, but variations like wine coolers, raised stools and secondary sinks have since gone in and out of fashion.

WHY THEY WORK

The way family and homelife has changed over the eras, kitchen islands have proven to be a useful feature of modern living spaces. Open concepts are now more the rule rather than the exception– yet another reason why most developments and renos hinge around this particular area of kitchen design. Since an island excels in both family settings and social functions, they transcend any one type of homeowner.

As you can see, we have progressed a long way from the spare table the cook pulls out when you call for a feast. The utility of kitchen islands is undeniable, which is proven by the fact that they are more popular than ever. If you have questions about updating or putting in an island, consult with the kitchen surface pros here at Stoneworks today!

BACKSPLASH MAINTENANCE

bathroom-backsplash-tileCustom backsplashes– the part of your kitchen wall behind the sink– have become extraordinarily popular in recent years. Ranging in material and style, both new builds and renovations tend to boast a bodacious backsplash that catches the eye. Whether to add style or value to your home, backsplashes are often good investments, but only if they remain in peak condition. Consult Stoneworks’ guide to backsplash maintenance below and be sure to contact our professional customer service team with any concerns.

Right Product for Right Material

Use the right cleaning product for the right material. The following are some common backsplash materials and their respective cleansers:

  • Glass: one part warm water, one part vinegar or a household glass cleaner;
  • Stone: one drop liquid soap per cup of water, applied with a soft cloth;
  • Marble: same mix as stone, but drying thoroughly is crucial;
  • Steel: same mix as glass, but do not use household cleaners– finish with a stainless steel polish for maximum shine;
  • Tile: one part hot water, one part vinegar– consult the next tip for cleaning grout.

Tile Backsplashes

For tile backsplashes, pay special attention to the grout. The lines between your tile are known as grout– due to their nature, they can become grimy and dirty if not properly cleaned. For best results, scrub your grout with a small brush and a water-baking soda paste. After this process, be sure to rinse completely with clean water and buff it dry to avoid water spots.

Seal It!

Invest in proper sealant and apply it correctly. Many natural surfaces such as granite or marble have specific sealants that need to be applied regularly. Other materials can also be sealed to prevent stains, reduce wear and mitigate dents or dings. Either way, always follow the manufacturer’s instructions exactly or else consider investing in professional assistance.

Extending the life and lustre of your kitchen’s backsplash is in the interest of every property owner. Don’t lose the value added by letting it age poorly– what was once eye-catching could soon be an eyesore! Stoneworks carries a wide variety of materials, so you can rely on our team to answer any questions you may have.

How Can I Decrease the Cost of My Bathroom Renovation?

The average bathroom renovation cost is around $10,500. But don’t worry, if that number is way out of your budget Stoneworks has five tips to help you decrease the cost of your bathroom reno without compromising on style or quality. Read on to learn more!

1. Do Your Own Demo

Hiring a demo team for your bathroom, while convenient, is not the most economical option. DIY-ing the demo and the majority of the renovation will go a long way in helping to keep your costs down. A word to the wise – make sure you do your research and know what’s behind your walls before you take a sledgehammer to it. You don’t want to end up hitting a water pipe or live electrical wire. If you are unsure, it’s always best to consult an expert. 

2. Limit the Amount of Tile

When you factor in the cost of the tile, as well as any labor costs for installation, tiling can get expensive quickly. If you’re looking to keep costs low, save the tile for the floor and shower and stick to simply painting the walls. You’d be surprised at how big of a change a coat of paint can make!

3. Don’t Move Major Fixtures

One of the major costs in a bathroom reno is moving major fixtures, like the toilet or shower. Moving these will require you to hire a plumber, which will greatly increase your costs. The more you can keep the layout the same – the more you’ll save!

4. Save on Countertops

Many people will opt for a classic countertop option, such as granite or marble, in their bathroom because the investment is much lower than what you’d spend on, say, an entire kitchen. The good news is that there are more ways to save than just sheer size required. Chat with your stone provider about choosing a slab that contains imperfections. These slabs are less expensive, and most times the imperfection is able to be removed to make room for the sink basin!

5. Redo or Buy Used

Buying and replacing your tub, toilet and shower is a quick way to rack up your bill. Instead of purchasing all new fixtures, look at getting them re-done! Getting your tub covered or re-lined is a great way to get a fresh, new look without a big price tag. If you do need to purchase new fixtures, look at buying used! You can great quality items at a fraction of the cost.

Renovating Your Bathroom?

If your next bathroom renovation includes new countertops, floors or cabinets, contact the team at Stoneworks Granite & Quartz. Our knowledgeable staff are ready to answer any questions you might have.

How Can I Decrease the Cost of My Kitchen Renovation?

kitchen-renovationThinking about a new kitchen? If you’ve started doing research, you’ve probably already figured out that it’s not hard to rack up the cost of the project. Read on to learn five things you can do to keep your cost low on your upcoming kitchen renovation.

1. Give DIY A Try

Being able to hire someone to complete your entire kitchen reno may be the most convenient option, but it comes with a price. Keep costs low by taking on some of the work yourself. Demo, painting, and installing new hardware are all things that can easily be learned and done on your own. Of course there are some aspects, like electrical work, that you should leave to the professionals, as mistakes can be dangerous.

2. Check Your Cabinets

Before you rip out your kitchen cabinets, make sure they actually need to be replaced! There are a ton of less expensive options that will still allow you to give your cabinets a new look, for example:

  • Staining
  • Painting
  • Replacing the hardware
  • Replacing only the cabinet doors
    etc.

If your cabinets are in bad shape and in need of replacement, stick to standard cupboard sizes to keep costs down. Opting for custom cabinets can result in significant price increases due to the extra work that goes into the process.

3. Don’t Move the Stove or Sink!

Moving your stove or sink to a new location can be a costly change, as it requires the gas and water hookups to be moved as well. Unless you’re knowledgeable in the area, you should hire a professional to move the connections – which also increases the expenses. If you’re looking for a low cost renovation, it’s best to stick with generally the same layout as you had before.

4. Keep Your Appliances

If your appliances are still in good working condition, keep them! Sometimes all it takes is one replacement part to make your fridge run like new. When your appliances finally start to bite the dust, be sure to purchase energy efficient models to replace them.

5. Track Lighting vs. Recessed Lighting

While aesthetically pleasing, and very popular, recessed lighting can be an expensive addition to your project. Not only do you need to cut numerous holes in your ceiling, but you’ll most likely need to hire an electrician to install the proper wiring. Track lighting is a cost effective alternative that will give you a similar look and feel to recessed lighting.

If your upcoming kitchen renovation includes new countertops, stone flooring or cabinets contact the experts at Stoneworks Granite & Quartz! Our team will help you build the kitchen of your dreams.

4 Factors That Determine The Price of Your New Countertop

New countertops are a great way to freshen up your space and increase the value of your home; however, they can require a significant investment. If you’re starting to collect quotes for a countertop reno read on to learn about a few of the factors that will go into determining the price of your new countertop.

Size & Shape

Naturally, the bigger the countertop, the more it’s going to cost. When shopping for a natural stone countertop, you’ll often be charged for the entire slab (even if you don’t end up using it all). Make sure you talk with your supplier, as they’ll be able to measure your area properly and minimize waste.

The Material

The countertop material you choose will play a huge role in the overall cost. It should come as no surprise that a slab of granite with semiprecious stones in it is going to cost more than laminate. It’s important when looking at the different options to consider what you need and want from your countertop. Some materials will require more maintenance, while others may not give you the look you’re after. When looking at natural stone specifically, the color, country of origin and availability will factor greatly into how much your piece of stone will cost.

Installation

The installation method required will also affect your overall price due to labor costs. Some countertops come as a slab for installation, while other materials need to be put together on-site. Granite comes in a giant, ready to install slab. This keeps install time to a minimum, but because of its size, it requires a more intensive (and expensive) transport process. Tile is affordable and easy to transport, but it requires a professional to place it, so more of your cost will go towards the installation.

Add-Ons

The little extras can often make a large difference in your overall cost. Some of the add-ons you should consider placing in your budget include:

  • Backsplashes
  • Complexity (e.g. sink cut-outs or other custom cuts)
  • Custom edging
  • Custom finishes (e.g. high gloss)

Ready for a New Countertop?

If you’re in the market for a new stone countertop, contact the team at Stoneworks Granite & Quartz. We’re happy to answer any questions, and will make sure you end up with a countertop that fits the look and needs of your home.

4 Home Improvements That Will Increase the Value of Your Home

toolbox-home-improvementsWhether you are looking to sell your home, or simply want to leave it in better condition than when you got it, home renovations are a great way to add value to your home! Read on for Stoneworks Granite & Quartz’s recommendation on four home updates you can do that will help increase your property value.

1.Kitchen Refresh

The kitchen is arguably one of the most important rooms in your home. As such, updating your kitchen is a great way to add value to your home. Modern cabinets, new appliances, and new granite countertops are sure to increase your home’s appeal to buyers. The addition of a backsplash is another common design choice that adds texture and dimension to your kitchen. If you want to take it to the next level, you could look at expanding the kitchen, and potentially adding an island. You can’t go wrong with updating your kitchen. Kitchen renovations often offer a large return on investment when it comes time to sell you home.

2. Bathroom Revamp or Addition

Updating the bathroom’s in your home is another great way to increase your home’s overall value. Similar to the kitchen, it’s an important room in a home, which means it usually has a high ROI. Look at updating the shower or tub, the countertop, toilet and perhaps the floor. Storage is important, so get creative and try to utilize any dead space in the room. If you only have one bathroom in your home, you’ll see a huge jump in value if you are able to add in a second bathroom – even a half bath can make a huge difference to future buyers.

3. Update Fixtures

If you are looking to increase the value of your home, but aren’t ready to spend money on a full reno, consider updating the fixtures around your house. A few of the fixtures to look at updating are:

While small, these changes add up quickly and can make a real difference in a home.

4. Curb Appeal

Your house may be beautiful on the inside, but you’re going to have a hard time getting future buyers inside if the outside of your home isn’t well maintained. First impressions matter – so taking some time to enhance your home’s exterior can help you maximize its value. Look at fixing up old or cracked siding, doing paint touch ups, and/or repainting brick walls. Also, never underestimate the power of a freshly painted front door!

Ready to tackle your next home reno? Contact Stoneworks Granite & Quartz for all your natural stone needs. From countertops to backsplashes and flooring, our experts will help you create the home of your dreams.

It’s All in the Details: Countertop Edging Options

kitchen-countertops
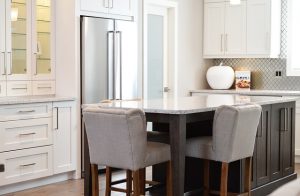
You use your countertop almost every day, so while it may seem trivial to focus on something as small as the edge of your countertop, it can affect the functionality of your kitchen or bathroom – so pay close attention! Read on for Stonework’s guide to the most common countertop edges.

Squared/Straight Edges

Squared or straight countertop edges work great with any style, although they lend themselves especially well to clean, crisp designs. This is the style you’ll see for most standard countertops. Straight edges are a great option if your kitchen or bathroom has a lot going on detail wise in other areas, as it will help bring balance to a room. Don’t worry – straight edges aren’t sharp as their name might imply. The corners of straight or squared edges are rounded slightly to protect the stone from chipping.

Bullnose Edges

Bullnose edges are rounded from top to bottom, making them excellent for households with little children! This type of edge lends itself to more traditional kitchens or bathrooms with it’s smooth lines. A great way to tie in your bullnose edged countertops with your room is to carry the curves throughout your space – perhaps in your cabinets or sink. Keep in mind that the roundness of the bullnose edge can make cleaning slightly more difficult as crumbs and dirt will often stick to the curved edge.

Eased Edges

Eased edges are similar to straight edges, but they have more pronounced rounded corners. Even this small change can make a noticeable difference in your kitchen or bathroom. Eased edges work great in a contemporary design. Many people prefer the eased edge over a straight edge because it gives the counter a thicker look.

Mitered Edges

Mitered edges give a standard-sized countertop a thicker appearance without adding extra weight. This is accomplished by taking a two piece approach in which a standard-sized countertop is wrapped with a thicker frame around the sides. A mitered edge is a great way to make your countertop the focal point of your space, and works well in both traditional and modern designs.

Beveled Edges

Beveled edges are known by their flattened 45 degree angle corners. Beveled edges are very easy to clean and work best with contemporary or modern-styled rooms.

Fancy Edges

There are a number of edge designs that fall under the category of fancy edges. These types of edges are great if you’re looking to create a unique countertop that will draw attention. It’s important to remember that a fancy edge can become overwhelming in a space if it’s overused- so be sure you’re implementing them tactfully.

If you’re unsure what edge to choose for your next countertops, consult with the team at Stoneworks Granite & Quartz. Our stone specialists will make sure your new countertop (and all of its edges) compliments your home.

5 Ways To Update Countertops Without Removing Them

kitchen-countertop-updatesRedoing your countertops is no small task. Depending on your situation, a complete redo may not be in the books – but that doesn’t mean you have to live with old, outdated countertops. Whether you are living in a rental or looking for ways to keep your reno costs to a minimum, check out these great alternatives to replacing your countertops.

1. Paint It!

Bet you didn’t know that updating your countertops could be as easy as throwing on a coat of paint! The options when it comes to painting your countertop are almost endless – some of them even mimic natural stone. If you’re considering painting your countertops, here are a couple things to keep in mind:

  • Be sure to prime the entire surface with an acrylic primer…. twice! This will ensure the paint sticks to your counter’s surface.
  • Always use satin or semi-gloss paint & primer. The higher the shine, the more protection it offers against scratches and wear.

2. Add Some Shine

Sometimes painting isn’t necessary, and a glossy coat of polyurethane is enough to spruce up your countertops. When applied to a lightly sanded, laminated countertop, polyurethane adds a deep glossy shine to the surface.

3. Granite Overlays

With this option you aren’t replacing your countertop – you’re simply covering it. Granite overlays are installed directly over your existing countertops and offer a couple benefits:

— Cost efficient
— Messy demos are avoided
— Can be installed in a day

It’s important to note that overlays are usually made out of a combination of stone, so if you are looking for the top quality that granite offers, it’s best to replace the countertops completely.

4. Cover It!

This may sound awfully simple, but if you’re working with a minimal amount of counter space in your rental apartment, sometimes the simplest solution is to cover it up. A large cutting board can offer both beauty and function to your kitchen.

5. Concrete Overlay

Covering your current countertop with a thin layer of concrete is an excellent way to update your kitchen or bathroom without breaking the bank. Concrete is a relatively budget-friendly countertop and is fairly heat and stain resistant when sealed properly. Keep in mind: your concrete countertop will need to be re-sealed on a regular basis to maintain its integrity.

Stoneworks Granite & Quartz can help you with all your natural stone needs. From countertops to backsplashes, our team of experts will make sure you get the kitchen or bathroom of your dreams! Call for your free quote today.

How to Clean Wood Cabinets

kitchen cabinets-kitchen-interiorIf you have wood cabinets in your home, it’s important to know the proper maintenance routine to keep them in tip top condition. Harsh chemicals and cleaners can damage your cabinets, leaving them looking less than ideal. Follow these simple cleaning tips to prolong the life and beauty of your cabinets for years to come.

Regular Care

The most important thing when it comes to the routine cleaning of your wood cabinets is to make sure you wipe up any spills or splatters right when they happen. Messes like these that are left on your cabinets for a prolonged period of time can cause permanent discoloration.

Your average duster will work perfectly for getting off any dust that accumulates, and a solution of warm water and mild detergent is generally all that is required to clean your wood cabinets. Use a soft, lint free cloth and always be sure to dry the cabinets after washing.

Long Term Care

Waxing your wood cabinets is not recommended, as it leaves behind a residue that not only attracts dust, but can sometimes cause your cabinets to appear discolored or streaky.

Once a year, consider polishing your cabinets with a light coat of a high quality, oil-based furniture polish. This will protect your cabinets and make them shine.

What About the Hardware?

Typically a good cleaning with warm water and mild detergent should take care of the majority of grime on your cabinet hardware; however, if you’re dealing with tough grime, it’s best to take the hardware off the cabinet and soak it in warm, soapy water. Make sure you let each piece dry completely before reinstallation.

Products to Avoid

The following products can damage your wood cabinets and should be avoided:

  • Harsh detergents, steel wool or any sort of abrasive cleaners
  • Any products that include bleach or ammonia
  • Silicone-based cleaning products
  • Petroleum based products (paint thinners, nail polish remover, etc.)

Looking for New Cabinets?

Stoneworks Granite & Quartz offers top quality cabinets made right here in Canada and expert installation. If you’re thinking about adding new cabinets to your home, give our team a call!